

Oyster mushrooms are popular for their plethora of beautiful colors and wide range of fruiting temperatures. With many varieties to choose from, any grower can easily diversify their logs based on mushroom color and seasonality of fruiting. Inoculating logs is simple and straightforward. Maintaining and managing logs is a matter of moisture management and patience. Before you begin, please be sure you have good quality logs to make the best possible mushroom growing experience.
*please note: King oyster, Black Pearl Oyster, and Pink Oyster are not recommended for log-based cultivation.
Follow the six steps below for inoculating and managing your Oyster logs.
1. Cut the logs
Healthy, living trees should be cut during the dormant season and rested a minimum of 2 weeks prior to inoculating. This allows time for the tree's defense system to die back. Protect the logs from drying out by storing them low to the ground (but out of the soil and leaf layer), out of the sun and wind, and where they can receive natural rainfall. Logs can be rested until inoculation for longer than 2 weeks, however there is increased risk of contamination and losing vital log moisture beyond 6 weeks.
NOTE: Logs can be cut to size for either the Drill-and-Fill Inoculation Method using standard log size (3-8" diameter x 36"-40" length) or the Totem Inoculation Method using larger diameter logs (6-12" diameter x 6-12" length).
Drill-and-Fill Method
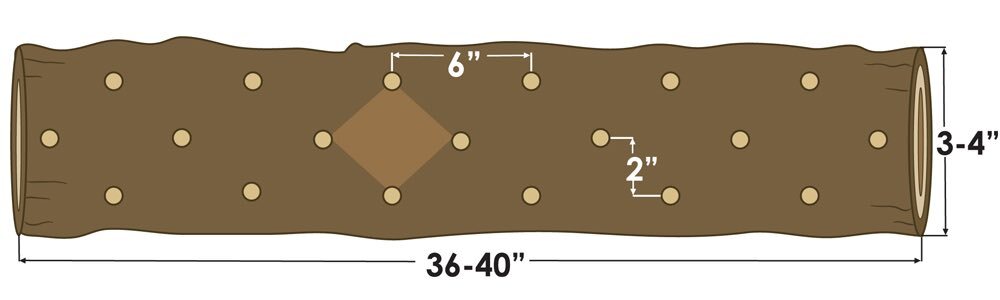
2. Drill the holes
Drill the holes to a 1˝depth following the diamond pattern for roughly 50 holes per log. Plug spawn requires a 8.5mm (5/16˝) drill bit, and sawdust spawn typically requires a 12.5mm (7/16˝) drill bit. Drill all the way around the log.
3. Inoculate and seal with wax
Plug spawn: Use a hammer and gently tap in one plug per hole so it is flush with the surface of the log. Seal each plug with melted wax or plug wax.
Sawdust spawn: Break apart the spawn and inject it into each of the holes, typically with the use of an inoculation tool.
4. Label the logs
Labeling logs with mushroom type and date inoculated can be very helpful - especially as you continue to build up your log inventory. We use aluminum tags (information is etched into the tag with a pen) or other labels, and staple them into the ends of the logs.
5. Incubate logs and manage for moisture
Once inoculated, place your logs in a shaded area, protected from the sun and wind, low to the ground, and where they can receive natural rainfall. Maintaining moisture during this phase is the most critical step to mushroom production success. We recommend your logs receive 1˝ of rain per week. If it is dry, you may need to sprinkle your logs. Logs will produce mushrooms in the fall after planting when the conditions for fruiting are ideal.
6. Mushroom harvest
Watch your logs closely after several months of incubation. Oyster mushrooms fruit spontaneously and quickly and you do not want to miss them. Each of the oyster varieties differ in fruiting temperature, though most tend to fruit in the fall of the year. Harvest mushrooms by twisting the cluster off the log. It is best to harvest when the edges of the caps are still curled down - mushroom quality and shelf life is better if you pick oysters young.
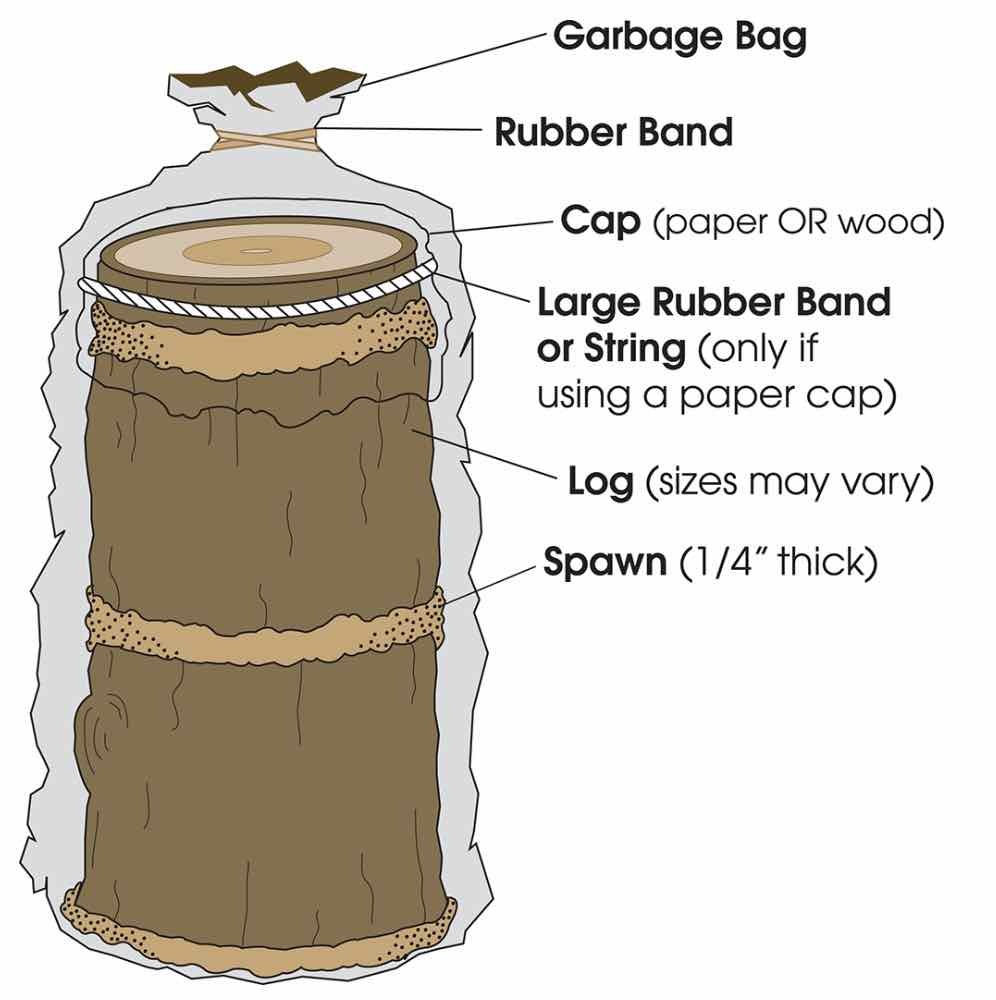
Totem Method
Place one cup of sawdust spawn in the bottom of a plastic garbage bag or large leaf bag. Set the log squarely on top of the spawn inside the bag (cut ends facing up and down). Sprinkle enough spawn on top of the log to cover it ⅛˝ to ¼˝ deep. Set another log on top of this and sprinkle more spawn. Cover and cap the top log with newspaper or brown paper bag and secure it onto the log (large rubber bands work well for this). You can also use a thin slice of log to cap the top. Close up the bag with a small rubber band leaving a slight opening for air exchange. Ideally they should be placed in an area with constant temperature between 55-75°F for 4-6 months.
Once the incubation phase is complete (you should see white fuzzy growth on the logs), remove the logs from the bag and place upright outdoors in a shady area where they are out of the wind and can receive natural rainfall. Watch your logs closely after several months of incubation. Oyster mushrooms fruit spontaneously and quickly and you do not want to miss them. Each of the oyster varieties differ in fruiting temperature. Consult the oyster chart for more information on when to expect your oyster to fruit and harvest as described in Step 6.
Alternatives for plastic bags
The plastic bag during incubation protects the logs and creates a warm, humid environment to support spawn growth and log colonization. Large thick paper feed bags, heavy cardboard boxes, or other materials fitted around the totem can also work. Bear in mind that log moisture and humidity around the totem during incubation is crucial to success, so these more breathable alternatives to plastic may require routine monitoring and watering.