

Every year in June we have a limited production of ready-to-bury Maitake (Hen of the Woods) blocks, and every year we sell out quickly. We will be offering the ready-to-bury block sets again, but we also offer this more hands-on option!
If you want to try your hand at making your own Maitake ready-to-bury blocks, we’ve produced a limited amount of the outdoor Maitake strain in grain spawn to make your own blocks. This grain spawn is a different strain than our usual maitake block grain for indoor production and we only produce it once a year. Keep in mind that maitake mycelium is light and wispy, leading to an "uncolonized" appearance in the spawn. This is normal!
Instructions below. Or, if you're more of a visual learning, watch our video Making Maitake Blocks for Outdoor Cultivation.
How to Make your Own Blocks
1) Gather the Materials
Multiple blocks can be prepared at one time, but for the purpose of this instruction sheet we will instruct per one block. Gather all the materials needed in a clean area, wipe down the countertops. For each block you will need: 5 cups fuel pellets, 1⁄2 cup bran, 1 1⁄2 cup grain spawn, and one filter patch bag.
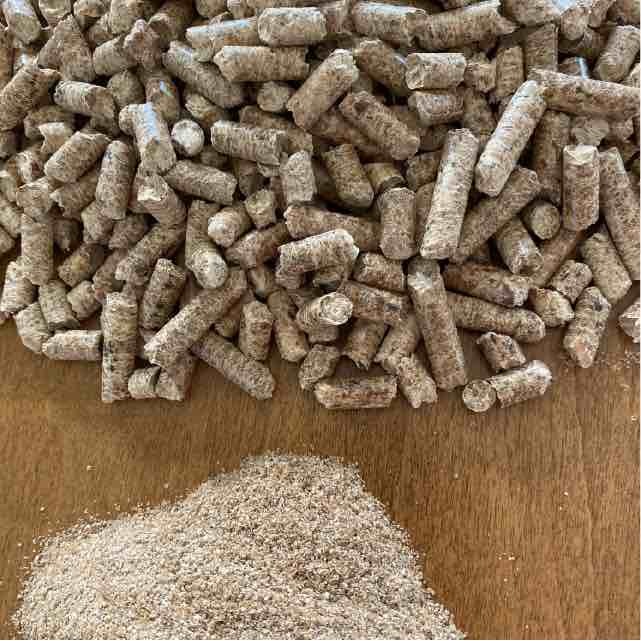
2) Prepare the dry materials
Measure out 5 cups of hardwood fuel pellets. Later you will add the same volume of boiling water in order to hydrate the pellets. Add the pellets to a standard 0.2 micron filter patch bag. Add 1⁄2 c bran to the fuel pellets and shake the bag to evenly distribute the bran.
3) Hydrate the fuel pellets
Boil 5 cups of water and add to the fuel pellet mixture. Be careful while working with boiling water. Seal or tightly fold over the bag after adding the water. The pellets will quickly heat and expand. Everything in the bag will semi-pasteurize from the steam.

Rehydrated dry materials
4) Cool the blocks
Place the newly hydrated blocks in the cleanest area possible, with little traffic and air flow. Be sure the bags are folded over tightly to reduce the risk of contamination by common molds. The blocks will need to completely cool before inoculation (12-24 hours).
5) Inoculate the blocks
Inoculate the blocks immediately upon cooling in a clean environment. Spray down work surface with bleach or alcohol and use gloves or thoroughly wash your hands prior to inoculation. The risk of contamination problems increases over time, so the sooner the bags can be inoculated the better. Carefully open the fuel pellet bag, pour in 1 1⁄2 c. grain spawn, fold the top of the bag over, shake to mix, then seal the bag. A rubber band tightly looped works well to seal (Figure 3). Be sure that the filter patch is not blocked to allow for air exchange.

5) Incubate the blocks
Once inoculated, place the blocks in an area with a temperature of 68-72°F where they will not be disturbed for 3-4 months. Over the next 3 months the maitake mycelium will form a protective skin. The block will turn white with the occasional orange streak or patch. At some point you may even see brown bubbles (see below) on the top of the block- these are fruiting bodies of the maitake, signaling that the block will be ready to start producing mushrooms as soon as the environment is right. We recommend "curing" the block for a minimum of three months even if the fruiting bodies appear earlier. Blocks can cure longer, but aim to have them buried outside at least 3 weeks before you typically see wild maitake in the late summer.
